Contents
- Introduction to the challenge
- Overview of the solution
- Detailed implementation
- AppleScript structure
- Downloading within the Office file system requirements
- Registering the add-in
- Supplementary routines : VBA Data folder and Support Script
- Creating the App from the Script
- Resulting installer
1. Introduction to the Challenge
During a period of 10 years or so, many application add-ins have been born in this software hospital. The vast majority of them started their lives on various versions of Office on the Windows OS
More recently though, Microsoft has made giant leaps in their cross-platform compatibility strategy. Office applications now run on Windows, OSX, Android, iOS and in a browser online. From various insights, we still see the majority of content being created on Windows and OSX even if the presentation of that content could take place on a mobile device. It’s this aspect of the designer’s world that led us to look at addressing the frequent request “can you provide your add-ins on the Mac?”.
Need to know the difference between the 3 types of add-ins?
A brief history of “add-ins”
Before we go any further, I should clarify what “add-ins” in this context mean, because it’s not at all clear. Many years ago, a programming model called VBA found its way into Excel. That then evolved and was adopted by all of the major Microsoft Office Suite of applications such as Excel, Word, Outlook, Access etc. These add-ins were simply known as “add-ins” or the longer term, “application add-ins” and gave third party publishers the ability to either extend the functionality of Office applications or automate them. Think of it as adding new features or making existing features do things over and over again, faster than a human can. VBA add-ins can be developed to run on a PC or a Mac but nothing else. Importantly, after 25 years since its introduction, VBA is still the only choice for developing tightly-integrated add-ins for both the PC and the Mac. And tightly integrated means adding ribbon tabs, modifying the built-in Office app ribbon, intercepting UI events, creating custom windows and other UI elements and integrating new functionality into context-sensitive menu (the menus that appear when you right-click on objects).
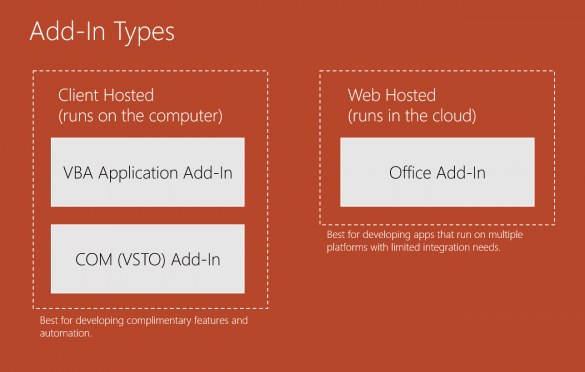
Next came the COM add-in or VSTO add-in. This introduced a new programming language and lots of new possibilities such as the ability to add custom panes (like the Format and Selection panes built-in the Office apps). A key common factor of both VBA and COM add-ins is that they provide a high degree of integration with the Office application. So much so that it’s possible to develop add-ins that look and feel like they are part of the original product. COM add-ins only work on Windows PCs.
The most recent phase of add-in development was the venture of Microsoft into cloud-based tech. The new Office Add-Ins model fits neatly with the desire to provide compatibility across a wide range of devices (PC/Mac), operating systems (Windows/OSX/Android/iOS) and platforms (desktop/mobile/online). These add-ins are hosted in the cloud which means you need an Internet connection to use them and because they’re designed using web-based technology, they can be designed to run on all the devices, operating systems, and platforms. Due to the variety of environments these add-ins have to work with, they are less tightly coupled with the Office application hosting them. What this means in reality is that you can’t do as much with an Office Add-In as you can with a VBA or COM add-in.
To the point in question
Add-ins in the context of this article are of the VBA flavour, because we’re considering Mac. So our installer will be solving the challenge of how to get an application add-in developed in VBA, installed on a Mac. With this in mind, these are the challenges:
- An installer on a Windows PC can take the form of an EXE, MSI or even Script-based solution such as VBS.
- The equivalent of EXE is DMG on a Mac but in the simplest case, an application add-in is a single file such as PPAM or XLAM so the overhead of such a model can be prohibitive.
- Office Mac lives in a sandbox. That is to say, it can’t [easily] communicate with the entire operating system and file system. For example, a developer used to be able to execute AppleScript directly from VBA in Office:mac 2011. Now they need to consider expecting routines pre-written in a script files that has to be pre-installed, in a special folder on the OSX file system. That’s pretty restrictive. And we have a solution. Read on!
- Apple. Need I say more. There is a propensity to tie developers up in red tape, complexity and extortionate profit sharing models. We’ll discuss this more later.
Although the concepts of this article can be applied to numerous Office applications, we’re going to focus on developing an add-in installer for a PowerPoint Add-In.
2. Overview of the Solution
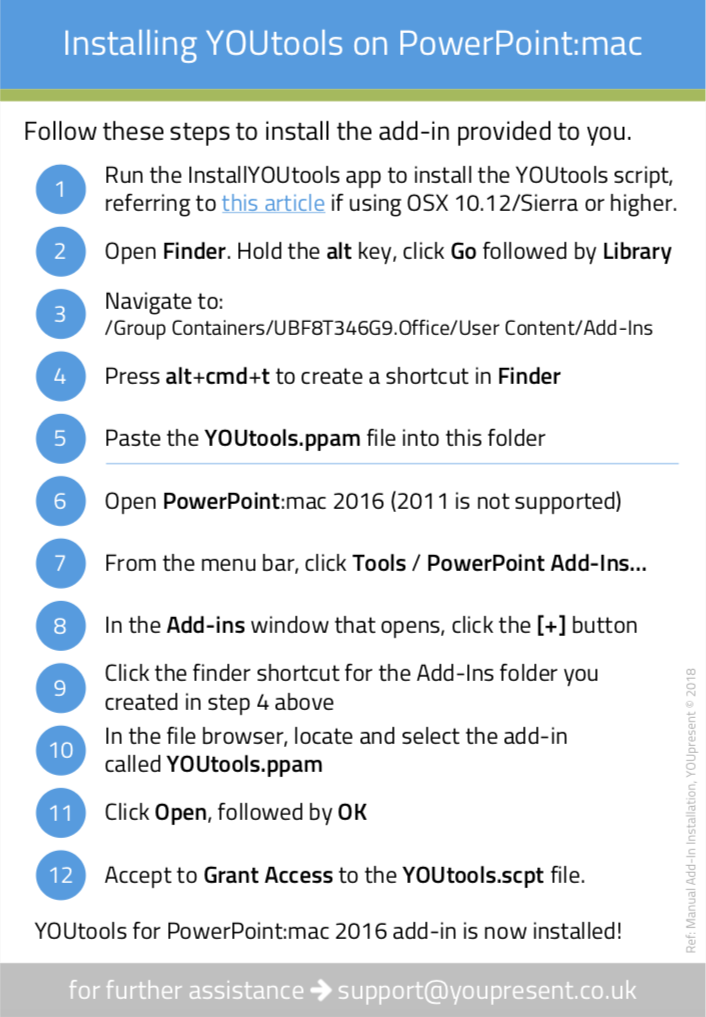
Our installer needs to be simple for users. Before we embarked on this project, we had the 12 step manual process to the right for users install an add-in on Mac. It’s very complex and laborious. Some people will be familiar with loading an application manually via the PowerPoint / Tools / PowerPoint Add-Ins… UI. But on Office 2016 it’s made more complicated because of the sandboxing environment, enforced by Apple on Microsoft. Users have to find hidden folders with obscure names and use weird Apple keyboard shortcuts in the process.
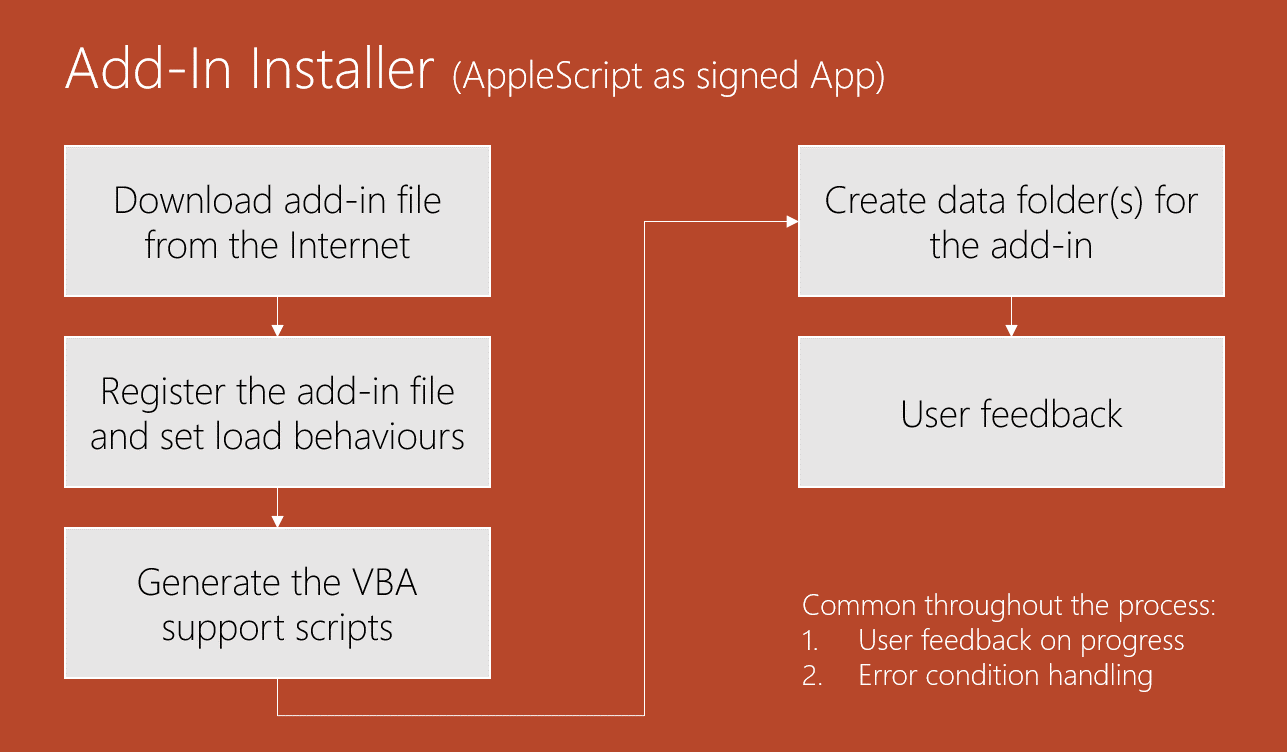
These are the components and actions of a typical VBA application add-in installer:
- The application add-in file. In this PowerPoint example, myAddIn.ppam
- Add-in registration and load behaviour programming
- Supporting AppleScripts in the form of a .scpt file
Instead of distributing all of the components of the add-in in a single package, we’re going to design a super lite add-in installer which downloads and creates the components during the installation process. To make things as simple and maintainable as possible, we’re going to use the AppleScript framework within the Script Editor app on Mac OSX.
Here’s the overall process flow of the installer:
3. Detailed implementation
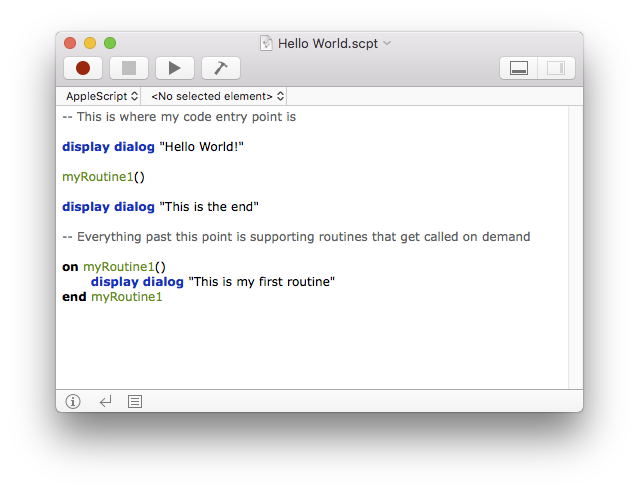
Before we get started on the actual AppleScript code, let’s take a look at the basic structure. A single script file can just contain a series of statements which are executed in sequence from start to finish. There is no concept of modules but we can create sub routines and functions using the on..end structure. In this example, the code starts by showing the first dialog. It then calls the routine myRoutine1 which in turn displays the second dialog and then code execution returns above to finally display the end dialog. We’ll be using this structure to create our installer.
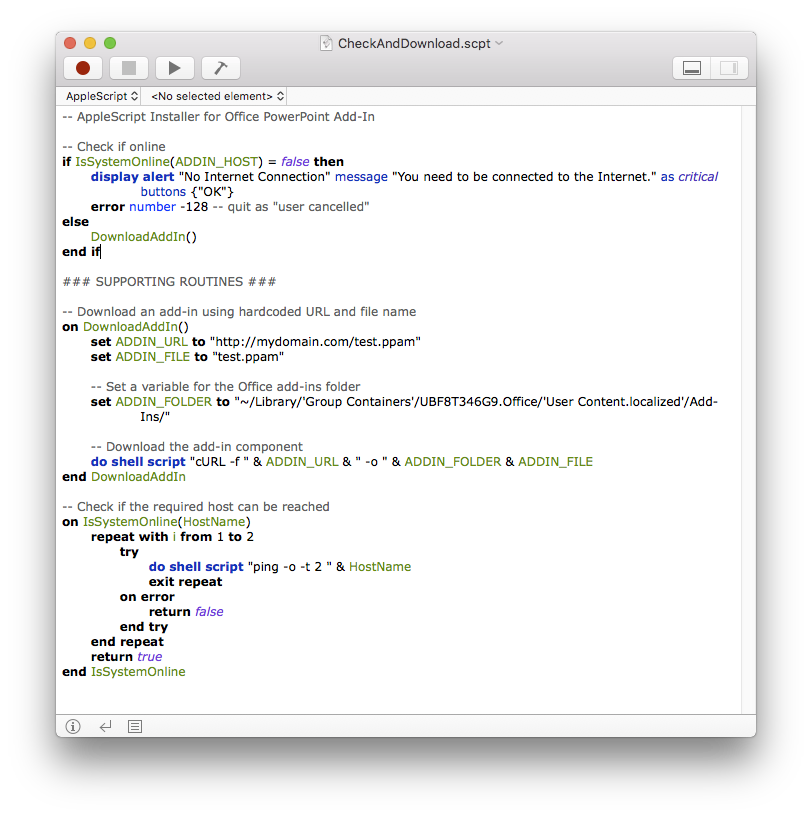
Referring to our installer architecture illustration above, the first thing we need to do is download the PPAM add-in component from our Internet server. To do this, we’re going to send a request to OSX via a Bash shell command. This is the shell command that uses the curl function:
The target FolderPathAndFileName variable needs to be set to a special location inside the Office 16 sandbox affectionately known as “UBF8T346G9.Office”. You can find the add-ins folder in Finder by navigating to the location shown below: (hold the Alt key down when clicking Go in Finder to reveal the Library folder)
~/Library/Group Containers/UBF8T346G9.Office/User Content/Add-Ins/
Now, that’s the path you see in Finder but it’s actually an alias to this path:
~/Library/Group Containers/UBF8T346G9.Office/User Content.localized/Add-Ins/
Finally, when we use paths in AppleScript which contain spaces, they need to be quoted. This is out of scope of this article as there are lots of ways to do this but here’s the simplest:
~/Library/‘Group Containers‘/UBF8T346G9.Office/‘User Content.localized‘/Add-Ins/
Putting all of this together, we arrive at a download routine like this:
But thinking about the overarching error handling aspect of our process flow illustration, what happens if the computer isn’t connected to the Internet? We could handle the error using the try..on error…end try structure. To make a better user experience, we’re instead going to write a function to return the online state. Here it is:
Registering the Add-In
The next step is to inform the Office Application, in this case PowerPoint, that there is a new add-in to load each time it starts. This is known as registering the add-in. On a Windows PC, registering is a multistep process that involves creating several keys in the Windows Registry such as a parent one for the add-in Name and then two subways for the add-in Path and AutoLoad behaviour. On a Mac, there is no concept as the registry and plist files are typically used instead. That used to be the method used for Office:mac 2011 but 2016 uses a pseudo registry implementation that resides inside an SQLite database. The database file is found in the Office sandbox folder here:
~/Library/Group Containers/UBF8T346G9.Office/MicrosoftRegistrationDB.reg
Now, we originally wrote an AppleScript routine to directly manipulate this database and have a working solution for that (we’ll see why it’s useful later). However, we then discovered that the appleScript Dictionary for PowerPoint includes the following command:
As a side note, an AppleScript Dictionary is a library of classes, commands, elements and properties which are accessible for scriptable apps.
You can access them by clicking Window / Library in the Script Editor and then add new ones such as those for all the scriptable Office applications by clicking the (+) icon and navigating to the Applications folder on your Mac.
Once loaded into the Library window, you can double click them to open the list of classes, commands, elements and properties available. They are colour coded with icons in the left hand side as follows:
S = Suite
E = Element
blue C = Command
purple C = Class or Collection
purple P = Property

On opening the PowerPoint Dictionary and searching for “register” we find the register add in command:
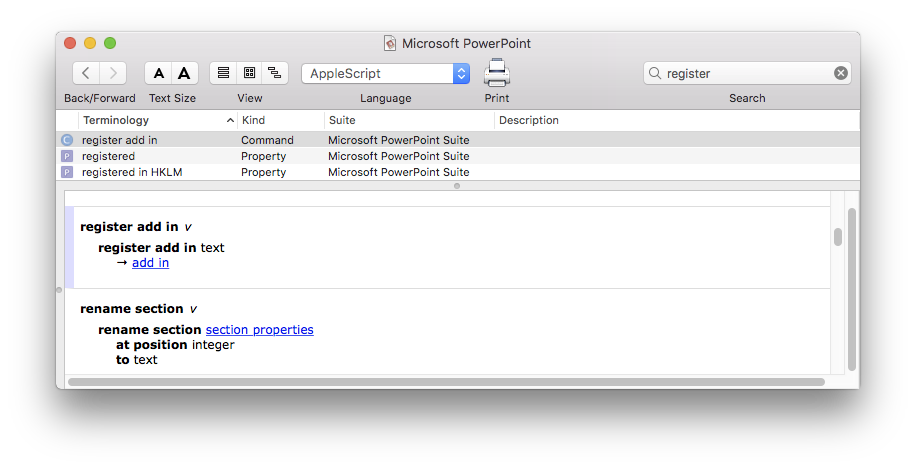
This command kicks off the registration of the add-in, making it viewable in the list of add-ins in the PowerPoint / Tools / PowerPoint Add-ins… UI but it doesn’t set it to load automatically when PowerPoint starts or load it in the current instance. We need to set two other properties of the add-in class to do this:
This is our completed routine to register the add-in in PowerPoint. The reason the manual database method could still be useful is that we didn’t find the register add in command for the Excel Dictionary for example.
The next part is to write the call to this routine in the main section of our script and with error handling in mind, we’re going to register the add-in and then read back some properties to make sure it was successful.
Note that the register add in command requires a fully qualified path to the add-in file so using a path beginning with ~/Library won’t work. To get round this, we write another support function which returns the user’s home folder:
And the final step is to provide the user with feedback:
Supplementary Routines
There are two other aspects of creating an application add-in that are optional but may well be required. The first is to have a folder inside the sandbox which the add-in can use to process various files and data. VBA used to be able to create folders in the sandbox using the MkDir command but in the latest version of Office 365, this appears to be problematic in that it creates a folder without the correct permissions so it can’t be used. To work around this, we built the following routine:
VBA Support Scripts
The final routine is probably the most complex because it’s a routine within AppleScript that creates an AppleScript. This may seem weird but VBA in Office :mac 2016 can no longer do everything script-related with the MacScript function and instead must reply on a new AppleScriptTask function that calls routines in script files that must pre-exist on the OSX file system, in another special Office app-specific folder. This is a short example of a routine to create such a script file in the PowerPoint scripts folder:
Finished Script
Our completed script (without the support routines) has a progress dialog added and looks looks like this:
Creating the App from the Script
Once the script is complete, we need to create an app from it that users can download from the Internet in order to install the add-in.
The script can be exported as an app with or without being signed with a developers code signing certificate. There are three options to choose from:
- No Signature
- Signature provided by a non-Apple vendor
- Signature issued by Apple
The behaviour and actions required by users to access the app for each of these three cases are described below.
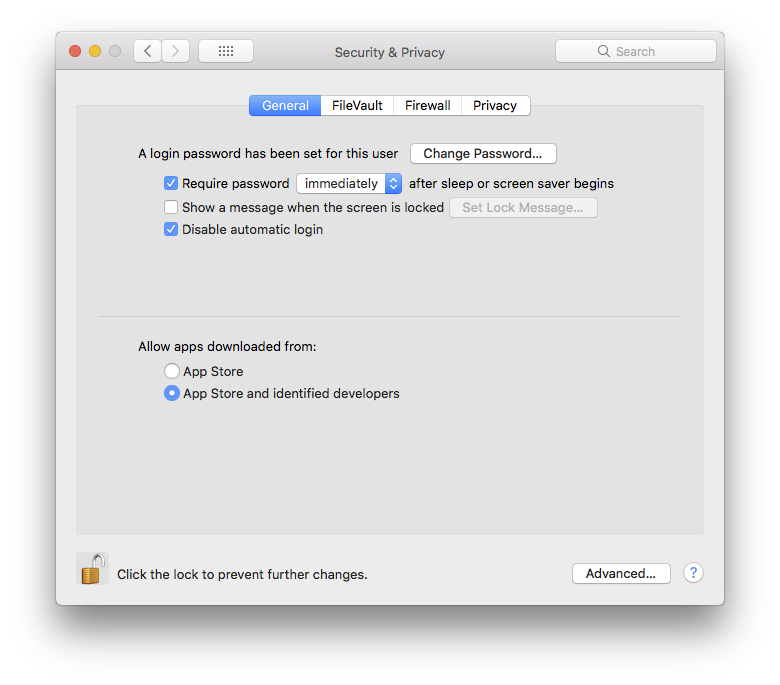
This is the worst case scenario for the user because OSX Gatekeeper will prevent the app from being run. Settings need to be changed in System Preferences / Security & Privacy to the Allow apps downloaded from option to be set to Anywhere as shown in the screenshot below.

But, from OSX Sierra onward, this third setting is hidden and requires the user to run the following terminal command to enable it:
sudo spctl –master-disable
And then turn it back on after the download is complete:
sudo spctl –master-enable
There will also be verbose security message presented to the user when they try to run the app.
This is not a process a customer should have to go through and is really only suitable for developers. This makes this option highly unsuitable and it’s not recommended.
The next best option if you already have a code signing certificate is to use it with the Script Editor to sign the exported app. Note that this still requires the user to set the System Preferences Security option to the second choice as below but they do not need to make any terminal changes.
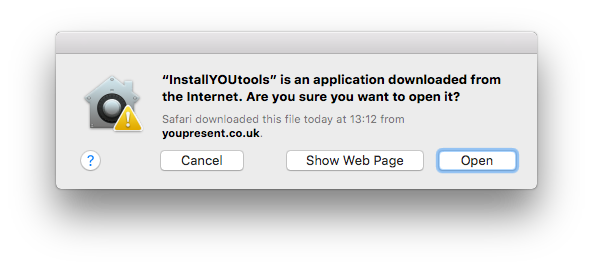
The other disadvantage of this solution is that Apple do not respect the ownership of an a legitimate signature from a third party vendor so when the user downloads the installer app, they are presented with a message like this:
The workaround is to instruct them to hold the Ctrl key while right-clicking on the app and selecting Open. This allows them to open the app as follows:
The third option is the best option, with the exception of distributing the installer in the official Apple App Store. The System Preference change in option 2 still needs to be made but the advantage of this approach is that the user no longer needs to use the Ctrl key to open the app. But even with a purchased Apple certificate the user still gets asked to confirm the execution which could still pose a question of concern in their mind. Apple really want developers to submit their apps to the App Store and take a cut of the profit!
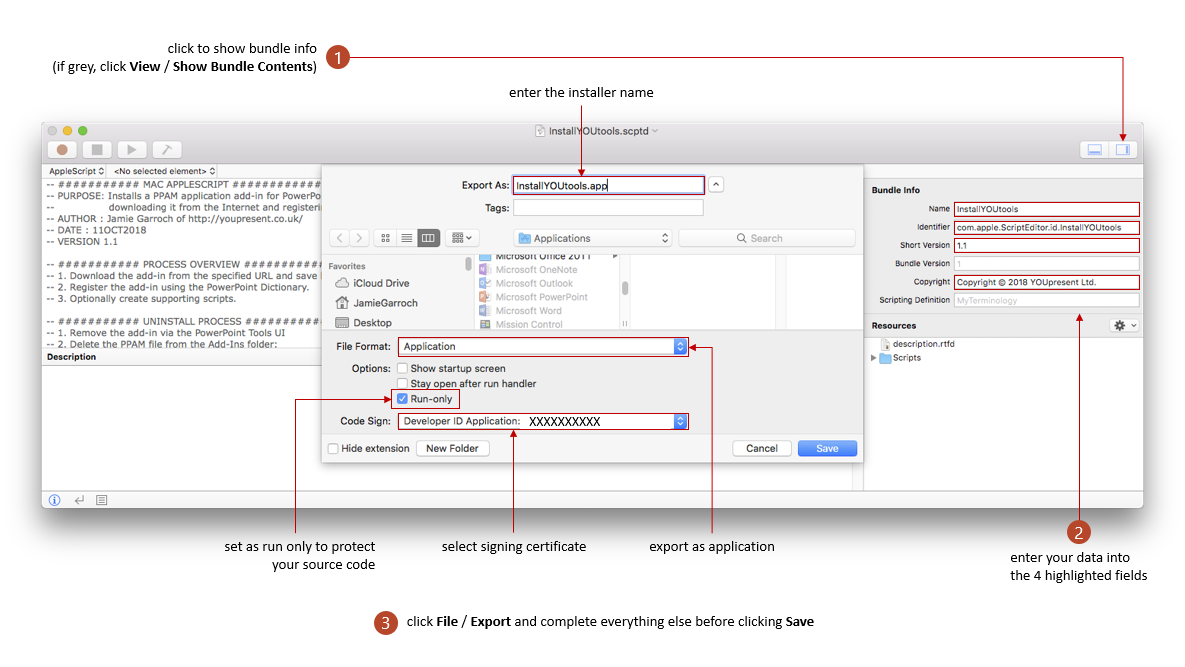
Signing the App
To sign the app you first set up the version fields and then click File Export and set the output type as app and select the required pre-installed signature: (signatures are set up via Xcode or KeyChain Access).
4. Resulting Installer
The first installer we built for Mac using this method was for our YOUtools add-in for PowerPoint. You can download the installer below.
YOUtools for PowerPoint Mac 2016
References
AppleScript Documentation (developer.apple.com)
Shell Bash (developer.apple.com)
PowerPoint Dictionary within Script Editor
Apple Developer Program (for the code signing certificate)
Signing Scripts (developer.apple.com)
SQLite.org (for the manual pseudo-registry manipulation)