A question many PowerPoint template creators ask themselves is “how can I stop users messing with my template and layouts?”. We’re going to share a little known capability of PowerPoint called “UI extensibility” (User Interface) which allows us to modify what appears in the PowerPoint ribbon. There’s no VBA programming involved although we are going to share some XML markup to show you how the ribbon is customised.
Most users (see the caveat at the bottom of this page) access the slide master from the view tab of the PowerPoint ribbon so the easiest way to stop users from gaining access to the slide master is to stop them having access to the Slide Master view.
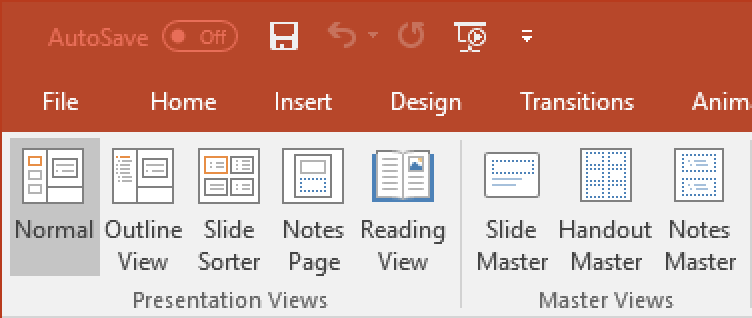
In the screenshot below we can see the default behaviour of PowerPoint and in the View tab, there is a group called Master Views and inside it are the three toggle buttons for each of the master views:

Using ribbon customisation we can do things like disable the Slide Master button:

…or hide the Slide Master button:

…or even hide the whole Master Views group containing all three master view buttons:

We’re going to start with the last example above because it’s the easiest one to create the ribbon customisation for.
What you’ll need
Like all great self-construction guides, you’ll need to know what tools you need before we start. Here they are:
- A Windows PC. It is possible to create ribbon customisations on a Mac but we’re not going to cover that here as it’s more complex. Note however that what we are going to create will work on PowerPoint:mac 2016 (2011 doesn’t have a ribbon).
- Any version of PowerPoint from 2007 onwards (that was the first time the ribbon appeared).
- The free CustomUI Editor application.
Step 1
Open your template file in the CustomUI Editor
Hang on. Step 0 is “close your file in PowerPoint”. You NEVER want to have the file open in two different apps! Once you’ve downloaded the Custom UI Editor, simply run it and from the File menu, open your PowerPoint file. Given we’re working on templates, that should be a .potx file but may also be a .pptx file.

Step 2
Insert a customUI XML part
That sounds like a mouthful but all we’re doing is telling PowerPoint that we’re about to give it some ribbon customisation instructions. Click the Insert button and select the 2007 part (the 2010 one has new features which we’re not using so if we stick to 2007, it offers the greatest compatibility for 2007, 2010, 2013, 2016 and newer versions to come):

Step 3
Copy/Paste some ribbon XML
Before we start pasting some XML, let’s just cover a couple of important things. XML is fussy. Real fussy.
First of all it’s case sensitive. If you get it wrong, your file won’t work properly in PowerPoint and even worse, PowerPoint will throw you a load of error messages. customUI is not the same as customui (and both these version appear in the XML we’re about to use).
Secondly, double quotes are unformatted. What I mean here is that they must be the simple vertical ones like this ” and not like these curly open and close ones “ ” which you often find are automatically created in Office apps as you type, thanks to auto-correct. As it’s not easy to see with this font, here’s a better view:

Finally, XML is a nested language. What this means is that one piece fits inside another and then that in turn fits inside a larger containing piece and so on. Think of it as a Russian doll. How the start and end of one element is defined in this structure is illustrated in this example:
This is my own XML markup to describe my cup of coffee. You can see the start of myCup and where it ends on the last line, indicated by the forward slash character. Note that EVERY element in XML must have a start and an end so the components (elements in XML) that make up my cup of coffee are all one line each but they too terminate with the slash character. I show you this because it’s common to forget these slashes, and guess what, if you do, you’ll get errors.
So, with that out of the way, here’s our first pair of lines, an opening and a closing XML element declaring the customUI part:
All the above line does is tell PowerPoint we’re about to give it some customisation instructions and this is the definition (schema in XML talk) we’ll use to describe those instructions. You should now be looking at this:

Now, think back to PowerPoint and how the UI (User Interface) is “nested”. We have a ribbon and inside that ribbon are a bunch of tabs. Within each tab are a bunch of groups and within each group is a bunch of buttons, check boxes, and other stuff you click on which are collectively called controls. So now you can see how we can get to the point we want to go in the UI, the Master Views group, with XML like this:
Scan the XML and see how a <group> is nested inside a <tab> which is then inside a collection of <tabs> which is inside the <ribbon>, all wrapped up inside the <customUI>.
Now you might be asking “what does this bit mean?”
Every Microsoft Office built-in control (button, gallery, toggle button, check box etc.) has a unique identifier. We are using this identifier, its idMso attribute, to tell PowerPoint that we’re about to change its default behaviour. Now I hear you say “but where can I find these idMso names?”. Microsoft publish lists of them and you can search online for “msdn microsoft office control identifiers” to find them for various versions of Office. I’m using this set of files for Office 2016.
Right then, we’ve navigated down through the UI to the place we want to change. Now the good bit. Let’s just tell PowerPoint to hide this Master Views group in the ribbon by adding an XML attribute for visible and setting its value to false:
You should now have this in front of you:

The CustomUI Editor app has a REALLY useful feature. Before you save your changes to the file and go check out what you’ve done in PowerPoint, you can validate that the XML you’ve created is correct.
Remember that first line that included this:
xmlns=”http://schemas.microsoft.com/office/2009/07/customui”
That tells the editor what version of the fluent ribbon XML definition (schema) is in use and that contains all of the rules about what attributes are allowed with what elements. It doesn’t check the values to if you write “TagView” instead of “TabView”, you won’t see an error until you open the file again in PowerPoint.
So you can simply click the Validate button to see if your XML is ok or not:

Assuming everything’s good:

Step 4
Save, Close and Test
Now you can save the XML to your PowerPoint file by clicking the save button and before we go check it in PowerPoint, don’t forget to close the file in the CustomUI Editor because you don’t want it open at the same time in two different apps. That’s bad news for your sanity and can corrupt your file!
Back in PowerPoint, you can open your customised template and see that the user no longer has access to any of the master views:
See how the Master Views group is no longer visible between the first Presentation Views group and the original third group, Show.
But I don’t want to hide the whole group!
That’s good. Because messing around with Microsoft’s built-in functionality this way can really confuse users. Let’s say they open another template that hasn’t been customised as we’ve done above. The Master Views group reappears. And then they Alt-Tab back to your template and the group disappears again. Cue numerous IT help desk support tickets!
So perhaps a better approach could be to hide or even just disable (the control remains visible but is inactive and shaded in grey) the Slide Master button.
Now you’ve seen some XML, you might think we could just do something like this:
See how we removed the visible attribute and got rid of the / from the end of the group line so that we could get “inside” the group to reach the individual button called ViewSlideMasterView and then set its enabled attribute to false, before closing the group on the next line.
This XML is completely valid. But if you save and close the file and reopen it in PowerPoint, you’ll get this error:
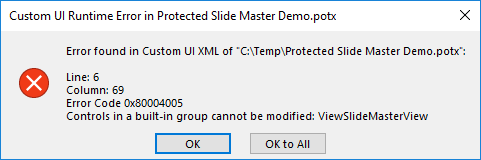
This is because Microsoft doesn’t allow you to modify their built-in UI at the group level. You can hide tabs and groups but you can’t hide/disable controls within groups. Neither can you add your own custom controls to built-in groups.
So what’s the solution?
Well, we get clever and hide the Masters View group as we originally did above and then recreate our own custom group to mimic that of Microsoft’s, adding their built-in controls into our custom group and then enabling/hiding them as we please, because it’s our group and not Microsoft’s. Cool huh?
So here’s the XML to do that:
And this is the result in PowerPoint:
Let’s take it step by step.
The first thing we’ve done is hide the built-in Master Views group with this line:
Next we create our own custom group (note the use of id not idMso), set the label that will be displayed to the same for the built-in version of the group and insert it after the built-in group for Presentation Views:
The next step is to add large versions of the built in buttons (which are actually toggle buttons) into our newly created custom group:
And finally, we’re going to disable the Slide Master button by adding the enabled attribute and setting its value to false:
This enables us to retain the familiar Microsoft UI but disable the button we don’t want the user to be able to access. In the original examples at the beginning of this article, we also included the case whereby we hid the Slide Master button. To do this, we simply change the enabled attribute to a visible attribute:
Caveat Time
So now you’ve seen how it’s possible to customise the UI that’s presented with your PowerPoint template and of course any presentations created from that template (the ribbon customisation gets copied across when you create a pptx from a potx). Now we have to think like a hacker and consider the question “what will my users do to try to circumvent this?”. There will always be someone who wants to undo your good work!
There are multiple ways to achieve most things in Microsoft applications. Opening the Slide Master view is no exception. Here’s three ways to do it:
- Use the ribbon to click the View tab and then click the Slide Master button
- Use a keyboard shortcut, which for the Slide Master view is Alt+W+M
- While holding the Shift key, click the small Normal view button in the status bar of PowerPoint (down on the bottom right of the PowerPoint window)
Our customisation handles the first two cases but it doesn’t handle the last one. Surprisingly, this status bar Normal view button is not just a small version of the one used in the ribbon in the View tab. It’s a completely different control so I was unable to find a way to disable this Shift+Button behaviour. But, like all things in life, an obstacle is a deterrent not a failsafe. This article will help you avoid “accidental” template damage by the casual user.
Please Share!
If you found this article useful, please share it with anyone you know in the presentation industry because sharing means more people can discover the power of extensibility in Microsoft Office applications.
Need Help?
If you have a need for customising PowerPoint, which can be anything from simple ribbon modifications to macro development and on to a full blown add-in, please contact us.