A good friend, Geetesh Bajaj, over at Indezine recently posted this article about the loss of a feature that used to be present in PowerPoint 2003. That feature is the ability to set transparency for a shape filled with a pattern. Let’s look at a design example with these three elements, the last of which is set with a 50% transparency fill:

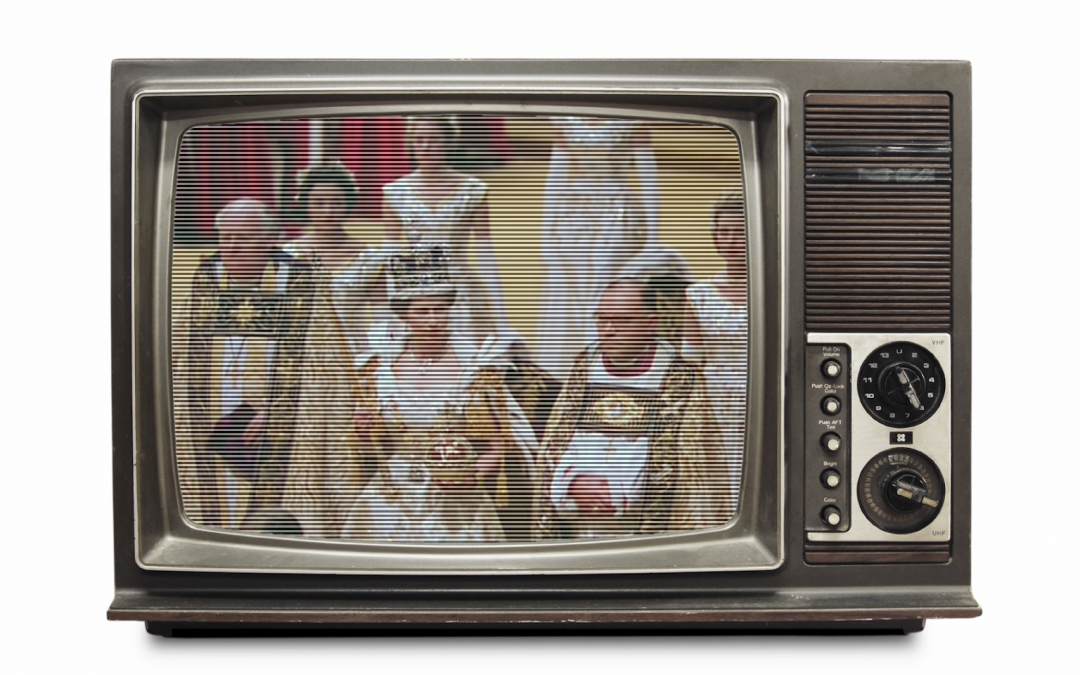
When we overlay these elements on top of each other on a PowerPoint slide, we get an image that looks like an old TV with scan lines:

TV Photo licensed under CC BY-NC-SA
Queen Photo licensed under CC BY-NC-SA
The Indezine article concludes with:
The second solution needs you to do some VBA programming and is not as difficult as you may imagine. We will explore that solution some other time!
So here’s how we built a VBA solution to add the feature back for the latest versions of PowerPoint both on Windows and on the Mac (we’re using 2016 in both cases but earlier versions should work too). Note that this isn’t intended to be a code tutorial but an overview of how we approached the solution.
Step 1 : Create the VBA Macro code
We found that the OM, or Object Model (the hierarchy which describes everything inside PowerPoint), still supports pattern fill transparency. We tested this by inserting a shape onto a slide, filling it with a pattern and with it selected, issued the following command in the VBE (Visual Basic Editor):
This set the pattern fill transparency to 50% and it worked as expected. Once we knew the OM still supported the functionality (note that it could be removed by Microsoft in a future update) we could work out how best to re-expose it in the UI (User Interface).
The first approach is to create a simple macro that the user runs by pressing Alt+F8. Here is the macro:
And here is the resulting UI whereby the user presses Alt+F8 to open the list of available macros, selects the one to run and then the dialog on the right is what the macro produces:


Now, this gets the job done but it does rely on the user knowing what percentage to set. What will probably happen is that the user will get frustrated having to do this several times to reach the desired result.
So a much better way would be to create some kind of slider as used in the Format pane of PowerPoint. We can’t add things into that pane so the next best thing is to create a custom window in VBA to allow the use to dynamically set the transparency while observing the result on the slide.
Here is the window (called a UserForm in VBA) that we designed:

Here’s the VBA code for this user form:
This is much better but it still relies on the user accessing the feature via the PowerPoint macros UI e.g. press Alt+F8, click on the macro to run, in this case SimpleUI and then click Run. That’s too many things to do. So how can we make it even easier? Use Microsoft’s UI extensibility model.
Step 2 : Create the Ribbon UI
There are many tools you can use to add a custom UI to your project but by far the simplest, quickest and most light weight solution is to use the free Custom UI Editor. You can use this tool to add ribbon tabs, groups and controls (buttons, check boxes, drop down combos etc.) but you can also use it to add items to other places of the existing PowerPoint UI. We don’t really want to create a new tab for one button to run our macro as that’s not space-efficient. We can’t add it to the Format pane as previously discussed so the best thing to do is add-it to the menu that appears when you right click on an object. These menus are called context-sensitive menus. And this is where we added our Pattern Fill Transparency menu item, seen here below the Paste Options part of the menu:

We want this menu item to appear when the user clicks on a built-in shape or a freeform shape. Again, we’re not going to go into the detail about what the code means but here is the XML that defines this menu:
Now that we have our XML code, we need to get our VBA code to turn this menu item on and off depending on what has been selected. For example, we don’t want to see the menu item when a shape without a pattern fill is selected. We achieve that with special procedures called callbacks. This is where the custom UI calls back to functions in our VBA code to find out how the UI should be presented. Here is the code for our callbacks:
You can see that the first callback checks to see if the selection is OK in order to decide if the menu item should appear or not and the second one is the one that’s called when the user clicks on the menu item.
Here’s the code for the SelectionIsOK function:
Now that we have our custom UI, the user just needs to right click on a pattern-filled shape, click Pattern Fill Transparency in the context-sensitive menu and then drag the transparency slider to the desired level whilst observing the effect in what Microsoft call Live Preview.
Step 3 : Create an add-in
You might have noticed that we’ve been building this solution in a presentation file (see the downloadable project file below). That’s no good if you want to be able to use your new functionality across multiple presentation files. So we need a way to publish our code so that it’s always available. That’s where application add-ins come into play. We can save our .pptm file as a .ppam file and then get PowerPoint to load that add-in each time it starts so that the functionality is always available, across all files that are opened in PowerPoint.
We’ve included instructions on how to do this in the open-source project file which you can download from below. You can also download a pre-compiled add-in version of the project that is digitally signed by us for your security and peace of mind. Note that if you try to create the add-in from the source code project file, this signature will be discarded. That’s fine and the add-in will still work, just without our digital certificate.
Conclusion
With a little bit of thought, effort, and a sprinkling of VBA magic, you too can create solutions to aid your PowerPoint productivity through the amazing capabilities of Microsoft Office Extensibility. Alternatively, let us do the hard work for you and contact us below!
Is there a way to modify this so you can independently select the transparency of each color fill? For example I want to have a stripped fill where the background is 100% transparent, so I can overlay the stripes over another picture without changing the underlying colors. (Basically a workaround for being limited to two colors in a pattern fill)
There’s no support for this in the PowerPoint object model so what I would do in this case is create a custom overlay comprising the multiple lines you need in the required width, colour, and transparency. You can then group that as an object and optionally copy/paste it back as a PNG image.